Category: Home and Family

Making Almond Flakes Cookie Crisps

It was Chinese New Year a few weeks ago and we were at Hub’s parents. Hub’s brother’s girlfriend made some almond flakes cookie crisps and it went down really well…there was not enough to go around.

I quite fancy loads to munch on myself so I decided to try to make some myself.

Went web surfing and made some modification on the recipes I found. I then made a few batches and distributed to some friends to try. It was a hit and friends started to ask for the recipe, so here it is:

Ingredients:

2 large eggs with egg white and york sperated (egg york is not required for this recipie – save it to make something else :))
60g caster sugar
50g plain flour (‘ve used self raising, think plain flour is crispier)
50g Almond flakes
25g melted butter (I’ve used diary free margarine – I can’t taste the difference)

Method

1. Beat egg white and sugar till sugar dissolved and bubbly (you can use a hand whisk or an electric whisk, I used the latter)
2. Add flour, almond flakes and melted butter, and combine well with a spoon. Leave it to rest in the fridge so it thickens a little (I’ve left it overnight before to save time).
3. Spoon about 0.5 teaspoon batter onto a non-stick baking sheet (1 teaspoon if you prefer bigger crisps, I make mine smaller as my munchkins have smaller mouths and as they are soooo crispy the cookies break as you bite into them …making a mess…best to make bite size portions) . If your so called ‘non-stick baking sheet is rubbish and sticks, spray or spread a thin layer of butter/oil on the sheet before spooning the batter.

4. Spread the batter as thinly as you can with the back of your spoon or dab it with your fingers. Don’t make it too thick, it is nicer when the crisps are wafer thin.
5. Bake them in a pre-heated (mine is fan assisted) oven at 150C at the lower rack for approximately 14-16mins or until all evenly golden brown (rotate the tray for few times for even browning if required).These crisps are amazing.
Try it and enjoy!

Making Gooseberry Almond Cake ( subs with Blueberry, Blackberry, Strawberry etc)

One summer we went strawberry picking with Ethan and found some gooseberries. I have never had gooseberries and decided to pick some to try…it was not until I’ve picked a large punnet, brought it home, washed them and pop it in my mouth…and then realised that you are not supposed to eat them raw! Instead of chucking the tangy fruit into the bin, I chucked it in a cake batter….and it worked a charm. I’ve been making it every summer ever since. Recently I’ve ben asked for the recipe…So Lin, here it is.

Ingredients
For the basic almond cake mix
125 g softened butter (or use dairy free substitute)
200 g castor sugar
3 large eggs
75 g sifted plain flour or self-raising (I’ve used both before and I can’t tell the difference)
75 g ground almonds
3/4 tsp baking powder
The fruit
350 g topped and tailed gooseberries (I have also used canned version, drained them first or they will be too wet. I have also substituted gooseberries with other fruits such as strawberries, blueberries, blackberries, raspberries etc they were all yummy)
The top dressing
35 g flaked almonds
1 tbsp icing sugar for dusting (optional)

Method

  1. Beat the butter with sugar until pale and fluffy.
  2. Add eggs one at a time beating after each addition. if the mixture starts to curdle, add some flour.
  3. Fold in the rest of the flour, baking powder and ground almonds.
  4. Scrape the mixture into a baking tin (20cm springform cake tim or a bread tin.
  5. Toss your gooseberries (or any berry fruit) onto the cake mixture spreading them over.
  6. Bake the cake for 25 to 30 minutes in a preheated oven (190 degrees C)
  7. Sprinkle the almond flakes and return to the oven for about 10 to 15 minutes or until the cake is cooked (use a skewer test to make sure cake is cook. If your fruit is too juicy, you may need to leave it in for longer)
  8. Leave it to cool, remove it from the tin and dust with icing sugar before serving (optional, though it does make your cake look more irresistible)

Enjoy!

;

20120903-105331 AM.jpg

20120903-114515 AM.jpg

20120906-082412 PM.jpg

Starting Your Very Own Herman Cake from Scratch

Since my last post about Ethan receiving his friendly Herman Cake from Nursery, I have got a few requests on how to start your own friendly Herman Cake. If you can’t wait to be given Herman, you can start Herman yourself. Here is how.

Ingredients
140 g shifted flour
200 g caster sugar
7 g yeast
280 mL warm milk
60 mL warm water

Method
Wake your yeast up by sprinkling the yeast into warm water. Leave to stand for about 10 minutes and stir.
Add sugar, stir and add flour and stir again.
Add milk slowly mixing thoroughly.
Cover Herman with a clean cloth and let him rest for 24 hours at room temperature.
Herman is ready for his 10 days cycle after the 24 hour rest

 Refer to my previous post for instructions on how to take care of Herman.

Have fun with Herman! Now you can share Herman with your friends 🙂  Will it spread like an epidemic (a good one of course, don’t want to offend Herman)? Tell me about it!


Making Churros (Mexican Long Donuts)

Another mummy day off for me as they boys are at nursery. I am counting down to the day that I will be starting work …. 6 more days …

Has it been one year already since my maternity leave?! Where did the time go!…Flew away for time waits for no men!

Am I looking forward to going back to work? Who am I kidding of course not. I will be missing my little men. Just thinking about it makes me miss them….but on the other hand, I am in need of some sanity…back to the big big world….where it involves other things other than nappy changing and feeding the kids and hubs.

Dont get me wrong, being at home taking care of the boys is very rewarding, I would love to be a stay at home mum, but also loved to be a working mum…can’t have it all can we…just take a day at a time, they boys will have new activities, fun, learn new things, make friends and do all sorts of awsomely fun messy play which I would not allow them to do at home. At nursery, they get to play with sand and water indoors in the middle of winter, squashing jelly on trays, finger painting with paint, tomato sauce and chocolate etc. Ethan even got to bake at nursery and make a mess without me telling him off for flinging flour everywhere.

Yesterday, after nursery Ethan and I made churros also known as Mexican long donuts. It was yummy, not too sweet to make him jump off the roof. Fun and easy to make and filled his belly during snack time when he was peckish. Posted the pictures on Facebook and got some interest. So here it is Jane and Polly, the easiest churros recipe. Enjoy!

Ingredients
50 g caster sugar
2 tsp ground cinnamon
(for coating the hot fresh churros, yum)

150 g plain flour (or self raising flour if that is all you have)
1 tsp baking powder
15 mL olive oil
250 freshly boiled water
500 mL vegetable oil for frying (approximate)

Method

  1. Place the sugar and ground cinnamon in a big container and mix by shaking (do a little dance if you like).
  2. Mix the flour and baking powder in a heat proof bowl.
  3. Beat in olive oil and the freshly boiled water. Keep mixing until you have a warm sticky dough.
  4. Let it rest for about 10 minutes or for as long as it takes for your frying oil to heat up.
  5. To cook the churros, heat up the frying oil in a saucepan (oil level should be approximately 1/3 way up the sides of the pan.
  6. To check oil temperature without an oil thermometer – like me! toss a small piece of bread into the oil. if it turns brown in 30 seconds you are ready to go.20120717-091158 AM.jpg
  7. Load a piping bag with a large star nozzle (8mm) and fill it with your churro dough.
  8. Squeeze approx 1.5 to 2 inch dough into the hot oil (or make it however short ot long you like) snipping the end with a pair of scissors as you go. You can also make funny shapped ones.
  9. They are ready when they turn golden brown, fish them with tongs or chopsticks or slotted spon even and place them on paper towel to blot off the oil.20120717-101120 AM.jpg
  10. To keep your Churros warm, place it on a baking sheet into a preheated oven (175 degrees C)….we didn’t bother with this step as we want ed it to cool down as fast as possible so we could tuck in.
  11. Rest the churros for about 10 minutes to allow the inside to set and so it doesn’t burn your mouth and throat.
  12. Place the warm churros in the container containing sugar and cinnamon and ‘shake it all about, you do the hookey pookey dance’ and that’s all about!
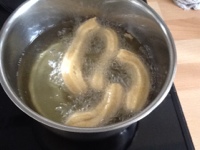
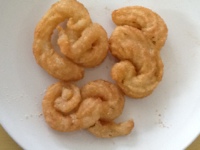
Make a choc dipping sauce and you will be dancing to another song Ha HaNote: if you find that your batter is abit runny, just add a little more flour…

    ;

    ;

Making Shortbread (Green Tea)

Ewan’s at nursery try-out giving me a few hours free to do as I pleased. I decided to take a nap, lay down for 10 minutes and was itching to do something else. Jane said the first thing she did when she was free from her kids were to have a long poo time! Classic Jane!

I saw this recipe (lavender shortbread) from a cook book given to me on Christmas and decided to try making myself some green tea shortbread. My experimental shortbread turned out scrummy! Here is the recipe, though I must warn you, it is extremely buttery and sinful Big Smile

Ingredients
70 g caster sugar (I used brown sugar to compliment the strong green tea flavour)
2 tsp green tea powder (optional you can use cocoa powder, dried lavender, dried rose etc for variations)
1/4 tsp fine salt (though I did omit this as I used salted butter)
350 g slightly softened and cubed (original recipe says to use unsalted, but I only have salted butter in the fridge)
350 g plain flour

Method

  1. Preheat oven to 145 degrees C.
  2. Mix sugar, salt and beat in the butter until well combined.20120716-085954 PM.jpg
  3. Fold in the flour until just combined (I cheated as the butter was sooo sticky, I broke my spatula whilst folding the batter, hence, I whizzed 3/4 of the flour with my electric mixer and folded the remaining 1/4 of the flour).
  4. Transfer the mixture into a brownie / baking pan (30 x 25 x 5 cm).
  5. Pat the dough down until well combined and level.
  6. Sprinkle caster sugar on top.
  7. Bake for 45 to 55 minutes until the top is golden brown and the edgse shrink from the pan.
  8. Remove from oven, allow to cool for 10 minutes in the pan.
  9. Remove from the pan and cut into squares.

Enjoy!


Making Healthy Banana, Carrot, Courgette (Fruit / Vegetable) Diary Free Cake

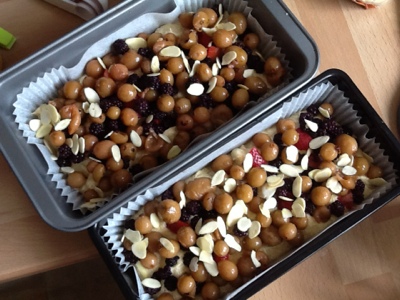
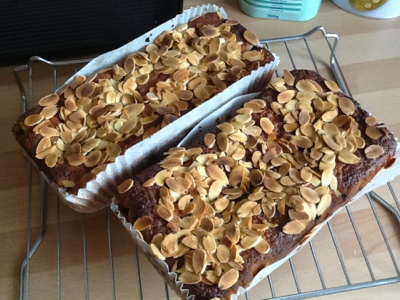
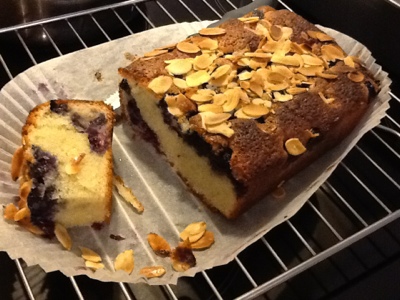
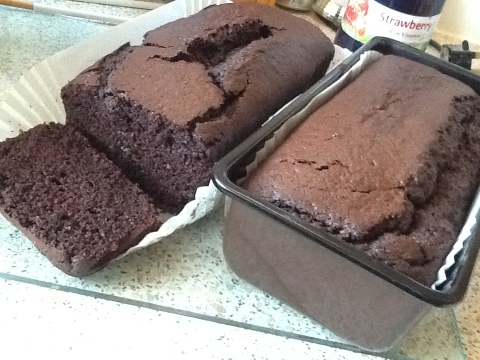
I have made this cake for more than 10 years, my boys and in-laws love it. Recently, I made this for a friend (with Ethan’s help of course) she and her little-lings loved it. Lin, this post is for you as promised, sorry it took so long.

This recipe is very versatile in the sense that you can use most fruits and vegetable as long as you follow the proportions and include 2 bananas and some carrots. I have substituted courgette with persimmon fruit, apples, pears, peaches and plums in the past. They were all yummy with the bonus of it being very easy to make and pack with fruits and vege!

Ingredients

250 plain flour or self raising flour (I used both before)
2 tbs baking powder
1 tsp bicarbonate of soda
1 tsp salt (optional)
250 to 150 g caster sugar (depending on how ripe is your banana and other fruits or if you are adding more vegetables to fruits ratio)
25 g pine nuts (optional)
100 to 25 g sultanas (optional)
175 mashed ripe banas (about 2 large bananas)
3 large eggs, beaten
250 g grated mixed carrots with courgettes or apples or pears etc.
150 mL sunflower oil (I have used other vegetable oil and olive oil)

Method

  1. Preheat oven to 175 degrees C and line a 9 inch cake tin with paper parchment – a loose-bottomed spring-release tin is best.
  2. Mix flour, baking powder, bicarbonate, salt, sugar, pine nuts and sultanas in a large mixing bowl and mix well.
    Add mashed bananas and beaten eggs.
  3. Stir in grated vegetables/fruits and finally the oil.
  4. Beat the cake throughly for a minute to a thick lumpy mixture.
  5. Pour into the prepared baking tin and bake for about 1 hour until a skewer inserted into the centre of the cake comes out clean.

Enjoy!


The Big Move

It’s been hectic for the past couple of months. First it was the big decision to move, then the process of house viewing, negotiation, solicitors, packing…not forgetting the moving on the actual day, fittings and redecorating the new house and the what seems like the never ending unpacking. Gosh, do we really have that much stuff?

In the mist of it all, the two boys had chicken pox….there is never a good time to be ill, but at least they have it over and done with.

Since my last post, Ewan has learnt to crawl, cruising confidently and even learnt to climb stairs and onto Ethan’s trampoline for a little jump! Busy busy 6 weeks!

We are more or less settled into our lovely new house, more to do…will do it slowly.

I will definitely try to write more posts as I know I still owe a few posts previously promised to friends and family. I have not forgotten them. Apologies for my absence.

Despite all which may seem chaotic, I think I was not too stressed out….mainly because hubby and I decided that we will get professional movers to move our things on the day! OK this may seem a given. …we have moved many times in the past, but we have always hired a van or truck and did our own move….we were younger and more energetic them 🙂 This time hubby and I did not lift a finger to carry anything on the day. It was brilliant. The removing man even carried Ethan’s wrapped up Birthday present with care. They were superb.

There was a choice for the removing man to do the packing and moving or we do the packing and they do the moving. We went for the latter….mainly so we know what we put in each box and only overselves to blame if we can’t find anything later.

If you are looking for a good remover company round where we are, we don’t mind recommending them. Drop me a line.

One moving tip from us….Pack and label your boxes, get a removing company to move your stuff for a pleasant and relatively stress free moving experience!

Ethan still says he misses the old house, but I know he is loving the new more spacious new house…Alan was a little sad to leave our old ‘home’ as it was where we started our family and where we had our two boys, but home is where the heart is and our heart is with our family. Loving our new HOME!

P/s Mum, here are a couple of shots of our new home as requested  o(^v^)o

20120626-074551 PM.jpg

Making the Ultimate Devil’s Food Cake

20120526-060415 PM.jpg

Making Beef Casserole and Beef Puff Pastry Pie for Busy Eaters the Easy Way

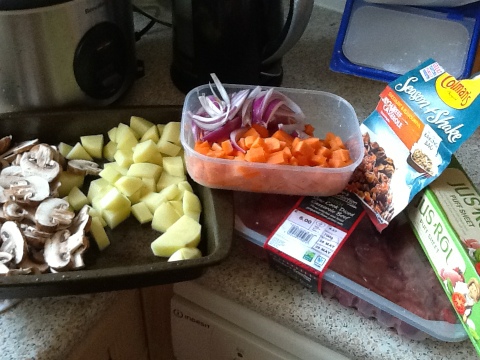
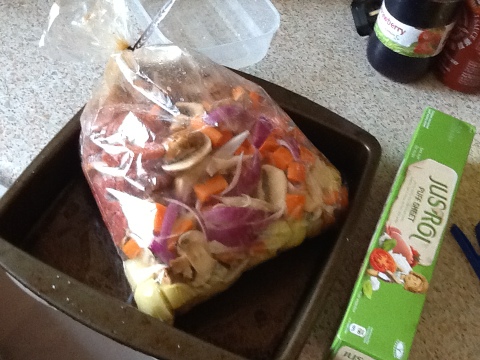
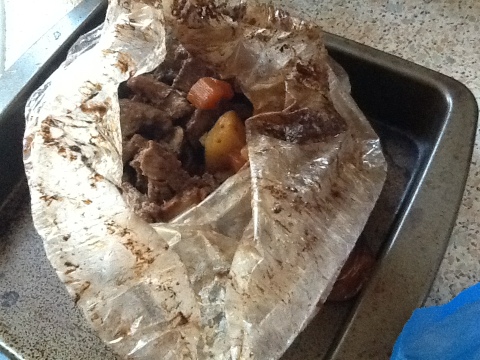
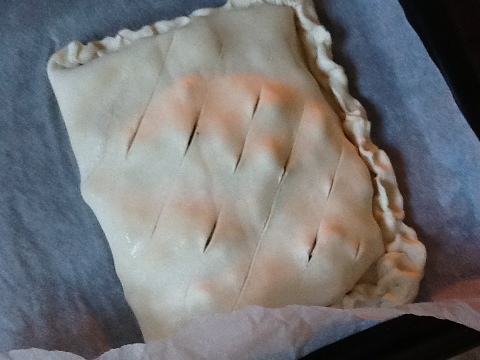
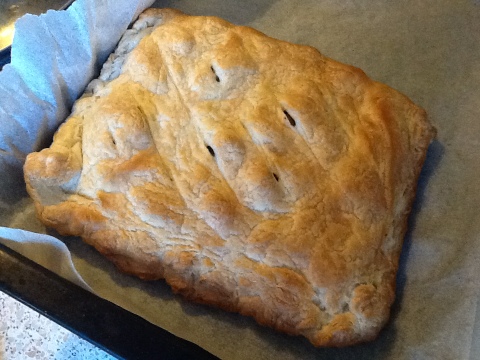
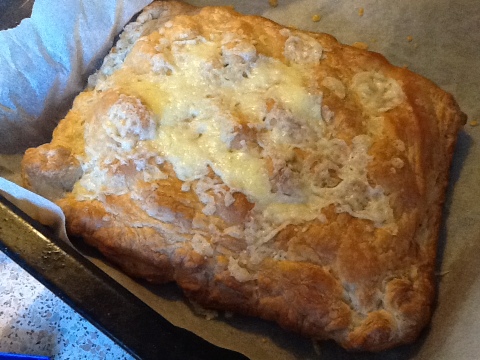
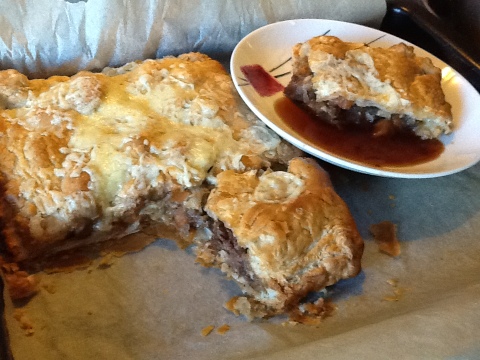
What do you do when you are too busy to cook but not too busy to eat a good meal? You find ways to make your life easier without compromising your balance diet…this is one of my very easy yet yummy recipies, even my 3 (nearly 4) year-old can make it…some say Iam cheating as I am using prepack spice and ready puff sheets. Cheat or not, it is easy to make, yummy and a balance meal.

Ingredients
500-700 g Diced beef
200 g Diced carrots
200 g Diced potatoes
150 g Sliced mushrooms
1 Sliced medium onion
2 tbsp oil
150 ml water
0.5 to 1 Colman’s beef casserole sachet (or you can marinate your beef with herbs, soya sauce, salt, sugar, wine, sherry depending on your taste, but for this post, lets concentrate on making your life easy and use ready packed spice…with no MSG or artificial colours or preservatives of course!)
2 x 320 g Jus Rol puff sheet

Method
1. Place all ingredients in the oven roasting bag provided (note, these are special oven bags, do not use ordinary plastic bag if you don’t want to eat melted plastic!)
You can do this the night before storing it in the fridge until you are ready to cook, perhaps when you come home from work!
2. To cook, preheat oven to 170 degrees C (150 degrees C for fan assisted).
3. Place the filled oven bag in the middle shelf and bake for 2 hour 15 minutes.
Note if you bake it at a higher temperature shorter time, your beef will not be as tender.

When this is ready….you can dig in or to make puff pastry pie, read on…

4. Preheat oven to 220 degrees C (200 degrees C for fan assisted) .
5. Unfoll your pastry sheet on a lined baking tray and spread with your yummy casserole to make a big pie. Cut the sheet to smaller portions if you want to make smaller pies. Leave some sheets so that you can wrap your beef casserole into a big neat parcel or many mini parcels.
6. Seal the sides and cut the top to allow the steam to escape whilst baking.
Optional….add cheese on top!
7. Bake for 20 minutes or until golden brown.

Soooooo Gooooood! Yummy meal made easy!

Dinner today will complete with yummy moist choc cake known as the Ultimate Devil’s Food cake!

20120526-023200 PM.jpg

20120526-023205 PM.jpg

20120526-023723 PM.jpg

20120526-060040 PM.jpg

20120526-060052 PM.jpg

20120526-060057 PM.jpg

20120526-061042 PM.jpg

20120526-061526 PM.jpg

20120526-072524 PM.jpg

Joys of a Nursing Mum: Weaning

For most mothers chose to nurse their young, I bet you can not agree more when I say most mothers have worries about establishing nursing in the early days, then find it difficult to wean the baby off without baby screaming bloody murder! I am one of the mummies!

Whilst searching the web on ‘How To’ I looked at the usual websites which helped and guided me in the early days….(La Leche League International , Breast Feeding Basics, Baby Centre)

…mostly suggest that the baby is weaned off gradually dropping a feed at a time, increasing solid…bla…bla…bla…then i found this website BabyZone which has a link to The Old Farmer’s Almanac . This is where it gets interesting!

In the old days, it is common for farmers to use astrology…mainly the moon to embark on certain tasks from sowing to harvesting crops without the need to watering plants ever…apparently the farmers went further to determine best dates to cut hair to promote growth or dates for cutting hair to prevent growth, …this gets better when the ‘best dates’ included dates to begin diet to gain weight and dates to begin diet to lose weight! How cool is that!

Naturally, the website provided what I was looking for ….weaning dates! Have a look at The Old Farmer’s Almanac’s Best to Calendar weather you want a date to go on a diet, quit smoking, start on a project etc… Try it and tell me if it worked…I will be trying the next recommended date for weaning for sure…no harm there…

definitely beats Ewan screaming for me to nurse him every 2 hours day and night!….What sleep, I know that I can function with 2 hourly cat naps…sleep is so overated! Feeling Good