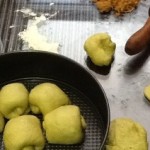
 There is nothing like the smell and taste of freshly baked bread or pizza…simple food for the soul…comfort food. As bread is filled with carbs, I always do my best to add more nutrients to my fresh bread by adding ‘super food’ . Such ‘super food’ or food loaded with nutrients includes fresh/powdered milk, fortified milk/juice (soya, almond, oat milk etc), fresh spinach, peas, beetroot, carrot etc.
Recently, I have been asked by friends and family to share my bread making method, with and without a bread machine, so here it is. The method described here makes scrumptious bread loved by my family and friends.
Making Bread Without a Bread Maker
The following are basic methods that I use to make my bread when I am not using my bread maker. Everyone does it differently and depending on the amount of dough you are making and available kitchen space :)…I have a small kitchen and I find mixing my ingredients in a big mixing bowl to begin with is less messy.
Method
- Place and mix all dry / powdered ingredients in a mixing bowl. Make a hole in the middle.
- Place wet ingredients (as applicable depending on the recipe) into the hole i.e., TangZhong, Old Dough, oil / butter, condensed milk, whipping cream, egg, spinach juice, beetroot juice, carrot juice etc. Leave the largest required amount of liquid aside e.g. milk / water.
- Warm 100 mL of the largest required amount of liquid (tends to be milk or water) using the hob or microwave to approx 37 degrees C and stir in the yeast. Pour the yeast liquid in the middle of the hole.
- Using a spoon, stir in the mixture starting from the middle of the hole in one direction. Add the remaining of the liquid slowly. You may or may not use all the liquid depending on the humidity of the air when you are making the dough. You will learn to judge once you have made bread a few time, if unsure, just add all the required liquid as per recipe (you may just have to use more flour when kneading to prevent sticking).
- When the dough thickens and all ingredient mixed in, knead with hands on a floured surface for about 10 minutes to stretch the gluten in the flour. You may need to keep sprinkling some flour on the surface to prevent sticking to the workbench and hands if your dough is too wet. To knead, lift and fold one end of the dough towards you into the centre, then pushing it down away from you using your fist or heel of your hands. Repeat whilst turning the dough around.

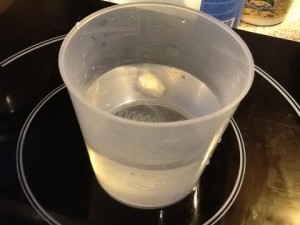
- To proof the dough, shape it into a ball and place it on a lightly greased or floured bowl and cover with cling film or a moist warm cloth. Proof in a warm and moist environment for at least 30 minutes making sure the dough roughly double in bulk. A neat trick my sister in-law tought me – place a small ball of dough (about the size of your little fingernail) into a glass of water, when the dough floats, you dough is ready for the next stage.
- Punch down your risen dough to remove air. Divide the dough, shaping it into balls and leave it a side, covered for 15 minutes to rest.
- Shape the dough and leave to proof for 30 to 40 minutes covered with cling film or wet cloth. Note, I omit this second proofing when making pizza.
- Bake immediately after second proofing in a preheated oven.
- When making bread, I bake the bread at 150 degrees C for 15 minutes, when making pizza, I bake it at 170 degrees C for 15 minutes. I have a fan assisten oven you may need to adjust your oven temperature to approx 180 degrees C for breat and 200 degrees C for pizza.
