Category: Home and Family

Making ‘Kaya’ Buns (Containing TangZhong) with Homemade Kaya

We have finally arrived in Malaysia, staying with mum and dad. After a few nights of rest (or rather few days of rest as we sleep in the day and are wide awake in the night due to jet-lag), I have been summond to make bread, after all the hoo haas and pictures posted on facebook and on this website (mum and dad have been following my posts…..bless), mum and dad are eager to try my bready experiments.
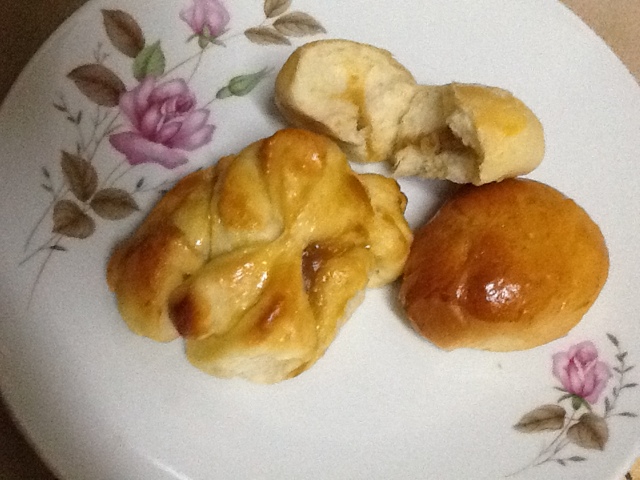
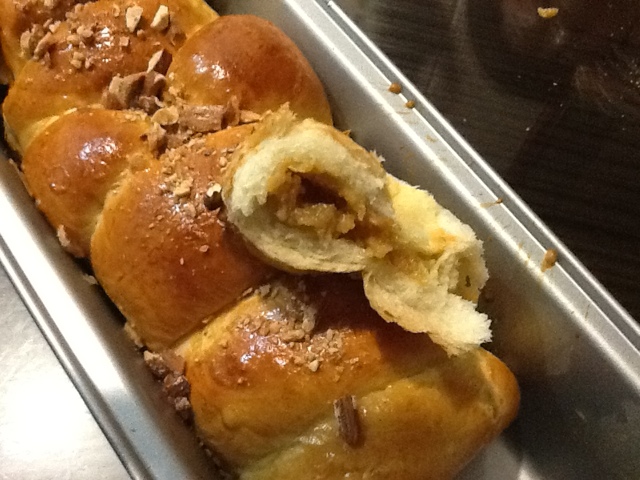
As kaya is one of my all time favourite especially on toast with butter, I have decided to make kaya buns.
My eldest syster in law (PP) brought her new gadget so we can make kaya and bread (the bread maker I bought for mum will be transported by hubs in 2 weeks time,….yes all the way from UK).
The kaya and buns from this post are made using sister in law’s Thermomix (I will provide a review on Thermomix later).

This recipe is quoted by dad, from my late uncle who was a Hainanese. My late uncle’s family used to own a cofee shop that sells amazing Homemade kaya toast.

Ingredients for Kaya (aka coconut egg jam or coconut egg custard)
1 cup eggs (or 4 medium eggs)*
1 cup caster sugar (or 200 g)
1 cup coconut milk (or 200 g)
3 pandan leaves (or use 1/4 tsp pandan paste)

*substituting one of the chicken egg with duck or goose egg will make your kaya smoother.

Method for making Kaya

  1. Take and keep a table spoon of sugar for later. Cream the rest of the sugar with the eggs until the sugar has dissolved.
  2. Place the mixture on a double boiler stirring continously.
  3. When the mixture is hot, pour the mixture through a sieve (optional but this will make the kaya smoother) and return to the stove on the double boiler.
  4. Add coconut milk whilst beating the sugar and egg mixture.
  5. Knot the pandan leaves and place into the kaya.
  6. Cook the mixture on low fire using a double boiler with continous stirring….this is the labourious step, the more you stir, the smoother is your kaya….at this stage stiring and cooking can take 1 to 2 hours. The longer you cook, the longer you can store the kaya.
  7. Caramelise  the table spoon of sugar (set aside from Step 1) in a saucepan about 30 minutes before the kaya is cooked and pour the caramelised sugar into the kaya mixture stirring quickly and evenly. The caramelised sugar will provide a rich brown colour and depth in flavour. It also adds fragrants.

To make the buns please refer to previous post on Making Hong Kong Sweet Buns (Pai Bao).

20120102-081153 PM.jpg

20120104-014917 PM.jpg

One Sleep Away before Our Exciting Long Journey to the Far East

It is now one sleep away before my 5 months old baby (Ewan) and myself will be starting our 18 hour journey to Malaysia via Dubai with Emirates. This will be Ewan’s first trip away, first time on the aeroplane and first time away from hubs and Ethan…It is also my first time flying with Emirates.

Ethan will be staying back with hubs for 2 weeks before they will be joining Ewan and myself in Malaysia. The four of us will then fly to Hong Kong. Talking about world travellers, we probably take the plane more often that taking the bus….seriously!

Am I nuts for taking Ewan on my own? 3 years back I probably won’t do it with my eldest.

I am so very excited…can’t sleep or am I bracing myself for the long and tiring journey, no doubt, at the end of the journey, when we do eventually reach our destination, it will all be worthwhile!

My experience travelling with Emirates and what I prepared when travelling with a baby and a toddler.


Making Tang Yuan (Glutinous Rice) Dessert for Winter Solstice

Today we will experience the shortest day and longest night, it is winter solstice after all. Winter solstice occurs exactly when the axial tilt of earth’s polar hemisphere is farthest away from the sun, this officially marks that winter is here. As a child, I always look forward to winter solstice as mum would always prepare Tang Yuan (or Tong Yuen) and makes effort to cook everyone’s favourite dishes. When eating Tang Yuan, mum would always say that we are now a year older and wiser.

Traditional Tang Yuan is made of glutinous rice flour. These days Tang Yuan can be prepared with various fillings ranging from brown sugar, palm sugar, black sesame paste, red bean paste and peanut paste.

It won’t be the same if I do not prepare this desert for my family today, so I rampaged to the Chinese Supermarket to get some glutinous rice flour (even though it’s extremely busy with scary grumpy Christmas shoppers everywhere).

When preparing Tang Yuan, I noticed that my mum and hub’s mum tends to take ages mixing and blending the dough (or perhaps I was impatient and like to be hands on rather than being on the sideline watching), but for me, when I prepare my Tang Yuan it takes me a few minutes. This may be because I make a ‘wet paste’ to allow the flour to ‘hydrate’ stepwise. I find the traditional Tang Yuan which contains only glutinous rice flour a little blend in texture so I added a little twist to enhance the texture and make my Tang Yuan bouncier. Here is how I make my Tang Yuan dessert.

Ingredients
For Syrup
Water
Brown or palm sugar to taste
A few slices of fresh ginger

For Glutinous Rice Balls
2 ¼ cups glutinous rice flour (I used pandan glutinous rice flour)
¼ cup plain flour (I used self-raising flour as that was all I had)
1 tbsp castor sugar
1 cup water
Food colouring as required (I tend not to bother with this)
Palm or brown sugar (filling, you can use other fillings, e.g. peanut butter, sesame paste etc.)


Method

To prepare the syrup, just put everything in a pot and boil and simmer for 30 min.

To prepare the glutinous rice balls

1)      Place a cup of water in a big clean bowl.

2)    Slowly, add a cup of glutinous rice flour and mix well with a spatula ensuring there are no lumps and to allow the flour to hydrate. This paste will be quite runny in consistency.

3)     Place sugar, ¼ cup of flour and another cup of glutinous rice flour into the paste and mix well. Gently knead the dough.

4)    Cover the dough and place it in the fridge for 30 minutes. This will allow the flour to soak up moisture.

5)     Divide the dough into several portions and add different food colouring into each portion (if required).

6)    Divide the dough into small bite size and make the dough into balls (Ethan made some worm-shaped, telephone-shaped, banana-shaped Tang Yuan).

7)     To place the filling, flatten the ball with your palm and place the filling in the centre of the ball. Seal and roll to make a ball.

8)      To cook the balls, place the balls in a boiling pot of water. As soon as the balls float, transfer the balls into the syrup water. Enjoy.

This recipe will make slightly harder, bouncier and chewy Tang Yuan (as it contains flour) and crunchy center (if you are using a lump of palm sugar). Try it and tell me if you like this recipe.


Making Chinese Steamed Buns (Man Tou)

The traditional Chinese steamed buns known as Man Tou 饅頭 are typically white with no fillings. Ethan wanted his buns green today so I added a dash of Pandan paste (which also made the buns nice and fragrant). Hubs wanted chocolate buns and all I had, was Nutella. Trying to please everyone I made (with Ethan’s help of course) Nutella filled Pandan Man Tou. I made 12 buns (the size of your palm after steaming) but you can make 24 good size Man Tou.


Ingredients

  • 5 g instant dried yeast or active yeast*
  • 250 ml water
  • 1 tsp vegetable oil
  • ¼ tsp Pandan paste (optional, you can add coco powder and green tea powder etc)
  • 40 g caster sugar
  • 500 g all purpose flour**
  • 1 tsp baking powder
  • Nutella for filling (optional, you can use azuki bean paste, caramel, sesame paste etc

*If using active dried yeast instead of instant yeast, it is best to hydrate and proof the active dried yeast with 250 mL warm water for 30 minutes before adding to the rest of the ingredients

** You can use superfine white Hong Kong flour but I tend not like it because it tends to be bleached. I only have self raising flour at home so that was what I used.


Method for making sweet dough

1 ) I used my trusty breadmaker to do the mixing, kneading and first proofing. The wet ingredients were placed in the breadmaker first followed by the dry ingredients and function set to ‘Dough’ on my breadmaker, sit back and relax. The ‘Dough’ cycle on my bread maker takes 1 hour and 30 minutes.

If you do not have a breadmaker, mix all dried ingredients and make a well. Combine the yeast and water in a bowl. Carefully pour the water containing yeast into the well and mix gently until all ingredients are incorporated. Knead gently for about 10 minutes do not over do it. Oil a medium mixing bowl, put the dough in it, and cover the bowl with a dry kitchen towel. Proof the dough for 1 hour and 30 minutes.

2 ) After first proofing, remove dough from the breadmaker (or oiled bowl, if not using a breadmaker).

3 ) Oil the work surface and hands with small amount of cooking oil.

4 ) Divide the dough into 12 (or 24 portions if making smaller buns).

5) Roll the dough into a ball.

6) If adding filling, flatten the ball with palm, place filling in the middle and seal the dough.


Method for shaping the dough

Making round buns: roll the dough into a ball (easy, no tricks) and place on a grease proof paper previously cut to size.

Making bunnies and hedgehogs: Roll a dough ball  into an oval ball, use a pair of scissors and nip/cut to make ears. Make more incisions to shape a hedgehog. I used black sesame seeds for eyes, you can use raisins or cut the dough to shape the eyes or even use  a couple of dots of food colouring. Place the shaped dough on a grease proof paper previously cut to size.

Making traditional Chinese buns: From Step 3, roll the dough with a rolling-pin  into a flat and thin rectangle dough. Fold the rectangle into 3 layers and roll with a rolling-pin again. Sprinkle or brush the flat dough with water and roll the dough with your hands into a tube or a log. Cut the tube (or log) into size. Depending on how thick  your log is and the size of the buns you want to make, you may get 8 to 24 portions. Place the shaped dough on a grease proof paper previously cut to size.


Proofing, Steaming and Storing

Proof the dough for 30 min before steaming, keeping the dough moist and slightly warm with cling wrap or wet cloth. Steam the buns for 20 mins. Steamed and cooled buns can be frozen and kept for a month. To heat frozen buns, just steam it for 10 to 20 mins (depending on the size of your buns) straight from the freezer.


Ethan and hubs were delighted with the pandan with Nutella hedgehog and bunny buns. We had it for dessert after our sushi.


Making Sushi

Here is my little chef making sushi. He wanted to make square and rectangular sushi so I didn’t bother with the sushi rolling mat. We have a pretty neat contraption where it makes square and rectangular sushi. It is so easy to use even my 3 years old can do it.

This sushi box is literally a box where you places the sushi filling between 2 layers of rice (top and bottom), sandwiched and compressed together. Once compressed, we can make ISO (In Side Out) sushi or maki sushi. I even used it to compress rice to make nigiri. We got this as a gift from Ethan’s aunty London, pretty neat.

We prepared all sorts of fillings: Crab sticks, fish fingers, chicken nuggets, apple with salad cream, smoked salmon, avocado, sweet egg, cucumber, sweet pepper, tuna and myo…in fact I prepared too much fillings and not enough rice!


Wishing you a very Merry Christmas and Happy New Year

Wishing everyone a very Merry Christmas and a Happy New Year. May 2012 brings you good health and prosperity .

Its 6 days and the last weekend till Christmas, how time flies when you are having fun.  We wanted to do some last minute shopping before the festive day. We set off early to our first destination, Ikea, for breakfast and decided to head towards home after breakfast as the shops were extremely busy. We could not be bothered (mainly hubs) to wrestle with the mob!

At home, we decided to make sushi and steamed Chinese buns (Man Tou). 


Saving Eletricity and Gas bills with Induction Hob

During my one month confinement period after giving birth to Ewan (this is a normal practice for Chinese cultures to protect the newborn baby and mother after birth), my mother was with us helping out and pampering me. Part of mummy’s pampering regimen includes making special soup and highly nutritious food which involved a lot of boiling, double boiling, simmering, slow cooking stews and steaming.

Hubs being the electrical engineer he is, started to think of a more efficient way, after all every little helps. It wasn’t long until he stumble upon and became a true follower of using induction hobs.

An induction hob has some serious advantages over gas and electric hobs.


So what is an induction hob and how does it work?

Induction hobs work by creating an electromagnetic field which doesn’t heat the hob itself but transfers the energy to your pan.
This means temperature increase on your cooking pan is instantaneous and cooking is far quicker.

On top of that an induction hob is an energy saver, making use of 84% of the energy produced compared with the 40% used by gas according to wiki.

The hob isn’t directly heated so it doesn’t get hot enough to burn and cools down very quickly the lack of a gas source means there’s no chance of a leak.

The last two safety features are very handy if you’ve got kids at home like us!

Making Rotiboy Buns aka Mexican Coffee Buns (Containing TangZhong)

The first time I tasted the famous Rotiboy bun was nearly 10 years ago bought as a treat by an old childhood buddy, Jamie during my summer holiday in Malaysia. It was when the Rotiboy bun hit Kuala Lumpur with a storm and “seduced the masses”. Recently I have been craving for Malaysian food and thought of the Rotiboy bun (recipe based on Mexican bun). There are a few versions of Rotiboy bun recipes, here is my version which uses TangZhong (I can’t get away from this TangZhong! It’s too addictive, LOL).

Filling

Ingredient

  • 180 g butter

Method

Cut into 18 pieces x 10 g cubes
(Notice I did not put sugar in the filling as I find it too sweet otherwise)

Coffee Topping 

Ingredients

  • 200 g softened butter
  • 160 g icing sugar
  • 3 lightly beaten eggs
  • 2 tbsp instant coffee dissolved in 1 tbsp water (I used decaffeinated coffee,smells and  tasted just as good)
  • a pinch of ground cinnamon
  • 200 g plain flour

Method

Cream the butter and sugar until light and fluffy. Add the beaten eggs gradually adding flour in portions when the mixture turns runny. Add dissolved coffee and mix well. Refrigerate the mixture
(Mixture must be refrigerated prior to use to harden it a little otherwise it will run down the dough/bun too quickly when baking).

Sweet Bun Dough 

Ingredients

  • 250g fresh milk
  • 120g TangZhong
  • 20 g milk powder
  • 75g castor sugar
  • 1 egg
  • 60g softened butter
  • 475g bread flour
  • 7g instant yeast

Method

1) I used my trusty breadmaker to do the mixing, kneading and first proofing. The ingredients were placed in the breadmaker in accordance to the list above and function set to ‘Dough’ on my breadmaker, sit back and relax. The ‘Dough’ cycle on my bread maker takes 1 hour and 30 minutes.

If you do not have a breadmaker, mix all dried ingredients and make a well. Carefully pour the milk into the well and mix gently until all ingredients are incorporated. Knead gently for about 10 minutes and mix in the butter. Do not over do it or you may break the gluten in the flour. Oil a medium mixing bowl, put the dough in it, and cover the bowl with a dry kitchen towel. Proof the dough for 1 hour and 30 minutes.

2) Divide the dough into 18 portions and roll them into balls.

Tips: I oil my hands and work bench with some cooking oil so the dough don’t stick everywhere rather than using flour – works a treat!

3) Flattern a ball and place a 10 g butter cube in the middle of the dough. Pinch the edge to seal the dough shaping the dough into a ball.

4) Place filled dough on a grease proof paper and cover with a wet cloth or cling wrap.

5) Repeat to fill all the dough with butter and proof the filled dough for 1 hour 30 min.

6) Pipe the topping in a spiral pattern onto the filled dough and bake for 12 to 15 min or until the buns are lightly brown in a preheated 200 degrees C oven.

7) Cool on a wire rack.

I made 18 buns one night (past midnight) and when I woke up in the morning, there were only 9 left! Hubs must be up in the middle of the night for a drink and decided to help himself with some buns (okay I did have 2 buns straight from the oven, but still, 7 buns in the middle of the night! That’s how irresistibly good they were! LOL)

These buns are best eaten warm, so when they are cold, toast or heat them in the oven / grill for a crispy top and enjoy with a cuppa!

Feeling adventurous, I have also made Rotiboy buns using the Hong Kong sweet buns (Pai Bao) dough. The difference is that the Pai Bao dough makes ‘milkier’ buns as it contains fresh cream and condense milk….it is a matter of preference, if you like a ‘milkier’ bun then do try using the Pai Bao dough.

Making ‘Momofuku’ Steamed Buns

It was my old friend from Uni who got me interested with this dish. We were chatting on Facebook when Richard mentioned that his wife will be making Momofuku pork belly buns for dinner. I was intrigued, didn’t know what Momofuku was but the word ‘pork belly’ caught my attention. So I did my usual Google search and found Veronica from Kitchen Musing’s recipe.

Here is my slightly modified version.

Ingredients (makes 50 buns)

1 ) 1 tablespoon plus 1 teaspoon active dry yeast
2 ) 1 1/2 cups water, slightly warmed
3 ) 6 tablespoons sugar
4 ) 3 tablespoons semi skimmed milk powder
5 ) 1/3 cup butter
6 ) 4 1/4 cups bread flour
7 ) 1/2 teaspoon baking powder
8 ) 1/2 teaspoon baking soda
9 ) 1 tablespoon salt
10) Some cooking oil for shaping the buns

Method

1 )      I used my trusty breadmaker to do the mixing, kneading and first proofing. The ingredients were placed in the breadmaker in accordance to the list above and function set to ‘Dough’ on my breadmaker, sit back and relax. The ‘Dough’ cycle on my bread maker takes 1 hour and 30 minutes.

If you do not have a breadmaker, mix all dried ingredients and make a well. Combine the yeast and water in a bowl. Carefully pour the water containing yeast into the well and mix gently until all ingredients are incorporated. Knead gently for about 10 minutes do not over do it or you may break the gluten in the flour. Oil a medium mixing bowl, put the dough in it, and cover the bowl with a dry kitchen towel. Proof the dough for 1 hour and 30 minutes.

2 )    After first proofing, remove dough from the breadmaker (or oiled bowl, if not using a breadmaker) and punch the dough down.

3 )     Oil the work surface and hands with some cooking oil.

4 )    Divide the dough in 50 portions (each weighing approximately 25 g).

5 )     Roll each piece into a ball, cover them with cling wrap and proof for 30 minutes.

6 )    Prepare fifty 4-inch squares of parchment paper.

7 )     Coat a chopstick or skewer with cooking oil.

8 )    Roll a ball into a 4-inch-long oval with a rolling pin. Place the greased chopstick or skewer across the middle of the oval and fold the dough into half.

9 )    Carefully Remove the chopstick and place the dough onto a square paper parchment.

10) Repeat to shape all the dough and cover the shaped dough with cling wrap and proof for a further 30 to 45 minutes.

11)  Steam the buns for 10 minutes and they will be ready for your indulgence. Cool the buns on a wire rack.

Ethan came home from nursery and was eating them on its own the whole afternoon! We didn’t have much left to freeze by the end of the day, but if you have plenty left, you can freeze them. Frozen buns can be stored for a couple of months.

Instead of pork belly, you can opt for a healthier option of using minced meat or even Quorn.

I used left over Bolognese sauce with loads of minced vegetable and beef as the filling.

Whatever you use as the fillings, these buns are soft and scrumptious as they are (proven by my little fussy eater who devoured most of the buns).


It’s Truely Getting Christmas-sy

You know Christmas is definitely round the corner when nativities have begun.

At Ethan’s very first nativity,  I noticed a couple of amazing things:

1) Excellent use of tea towels!

2) 3 years old toddlers CAN be quiet and CAN stay in one place for at least 30 minutes (truly gobsmacked, I need to learn how to keep them that way!)

Aren’t they cute!